

VMware虚拟机及docker配置代理
代理 IP 及端口
以无线局域网适配器 WLAN 为例
确保宿主机能够访问 https://hub.docker.com/,查看代理地址,配置为 IPv4 地址 192.135.0.161,端口在代理工具端查看
C:\Users\coding>ipconfig
无线局域网适配器 WLAN:
连接特定的 DNS 后缀 . . . . . . . :
IPv6 地址 . . . . . . . . . . . . : 2409:20e2:102c:7bd0:5d2c:c588:dd82:e298
临时 IPv6 地址. . . . . . . . . . : 2409:102c:102c:2409:147c:8d00:470d:147c
本地链接 IPv6 地址. . . . . . . . : fe80::fd4f:fd4f:fd4f:6fd6%12
IPv4 地址 . . . . . . . . . . . . : 192.135.0.161
子网掩码 . . . . . . . . . . . . : 255.255.255.0
默认网关. . . . . . . . . . . . . : fe80::f83d:fe80:fe24:f3ce%12
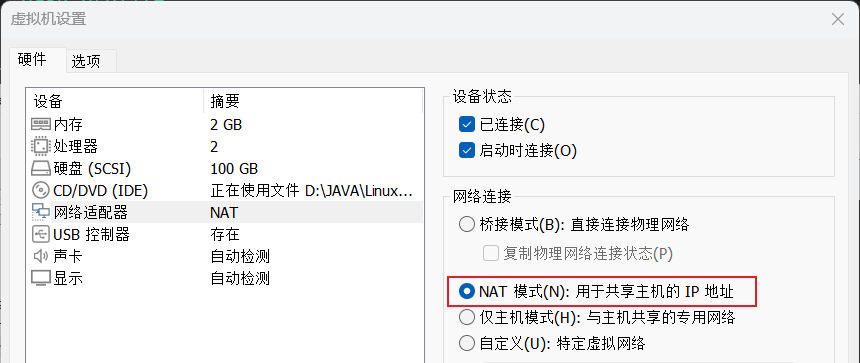
192.135.0.1VMware 设置
Vmware 虚拟机右击设置-> 网络适配器-> 网络连接选择 NAT 模式
Linux 配置修改
编辑文件/root/.bash_profile
#若开启认证:http://username:password@proxy_address:port
export http_proxy="http://192.135.0.161:11823"
export https_proxy="http://192.135.0.161:11823"
export ftp_proxy="http://192.135.0.161:11823"
export no_proxy="localhost,127.0.0.1"
export WGETRC="$HOME/.wgetrc"
wget 代理配置/root/.wgetrc
use_proxy = on
http_proxy = http://192.135.0.161:11823
https_proxy = http://192.135.0.161:11823
重新加载配置
[root@swarm-master ~]# source ~/.bash_profile验证配置是否生效
[root@swarm-master ~]# echo $http_proxy http://192.135.0.161:11823 [root@swarm-master ~]# wget -O ./index.html https://hub.docker.com/ --2024-12-01 13:36:16-- https://hub.docker.com/ Connecting to 192.135.0.161:11823... connected. Proxy request sent, awaiting response... 200 OK Length: unspecified [text/html] Saving to: ‘./index.html’ [ <=> ] 116,666 175KB/s in 0.6s 2024-12-01 13:36:18 (175 KB/s) - ‘./index.html’ saved [116666]
Docker 配置代理
http-proxy.conf 配置,没有则创建
[root@swarm-master docker.service.d]# vi /etc/systemd/system/docker.service.d/http-proxy.conf [Service] Environment="HTTP_PROXY=http://192.135.0.161:11823" Environment="HTTPS_PROXY=http://192.135.0.161:11823" Environment="NO_PROXY=localhost,127.0.0.1" 新加载 systemd 管理器配置
在修改配置文件后,您需要重新加载 systemd 配置:
sudo systemctl daemon-reload重启 Docker 服务
在重新加载配置后,重启 Docker 服务:
sudo systemctl restart docker检查 Docker 服务状态
再次检查 Docker 服务的状态,确保它正在运行:
sudo systemctl status docker通过 docker info 查看配置是否生效
[root@swarm-master docker.service.d]# docker info | grep Proxy
 HTTP Proxy: http://192.135.0.161:11823
 HTTPS Proxy: http://192.135.0.161:11823
 No Proxy: localhost,127.0.0.1
配置 docker 镜像站
[root@swarm-master docker.service.d]# cat /etc/docker/daemon.json
{
    "registry-mirrors":["https://hub.docker.com/"],
    "insecure-registries": ["192.168.0.134:80"]
}
通过 docker info 查看 docker 镜像源配置
[root@swarm-master ~]# docker info | grep -A 3 "Registry Mirrors:"
 Registry Mirrors:
  https://hub.docker.com/
 Live Restore Enabled: false
删除之前拉取的镜像
[root@swarm-master docker]# docker images | grep nginx | awk 'NR>1 {print $3}' | xargs docker rmi --force拉取镜像
[root@swarm-master docker]# docker pull docker.io/library/nginx
Using default tag: latest
latest: Pulling from library/nginx
2d429b9e73a6: Pull complete
20c8b3871098: Pull complete
06da587a7970: Pull complete
f7895e95e2d4: Pull complete
7b25f3e99685: Pull complete
dffc1412b7c8: Pull complete
d550bb6d1800: Pull complete
Digest: sha256:0c86dddac19f2ce4fd716ac58c0fd87bf69bfd4edabfd6971fb885bafd12a00b
Status: Downloaded newer image for nginx:latest
docker.io/library/nginx:latest
本文是原创文章,采用 CC BY-NC-ND 4.0 协议,完整转载请注明来自 程序员小王
阅读建议
评论
匿名评论
隐私政策
你无需删除空行,直接评论以获取最佳展示效果